How To Repair Lath and Plaster Walls and Ceilings
DIY Repair Your Lath and Plaster Walls and Ceilings
After many decades of faithful service, the old lath and plaster walls and ceilings in your home have started to fail. It happens eventually.
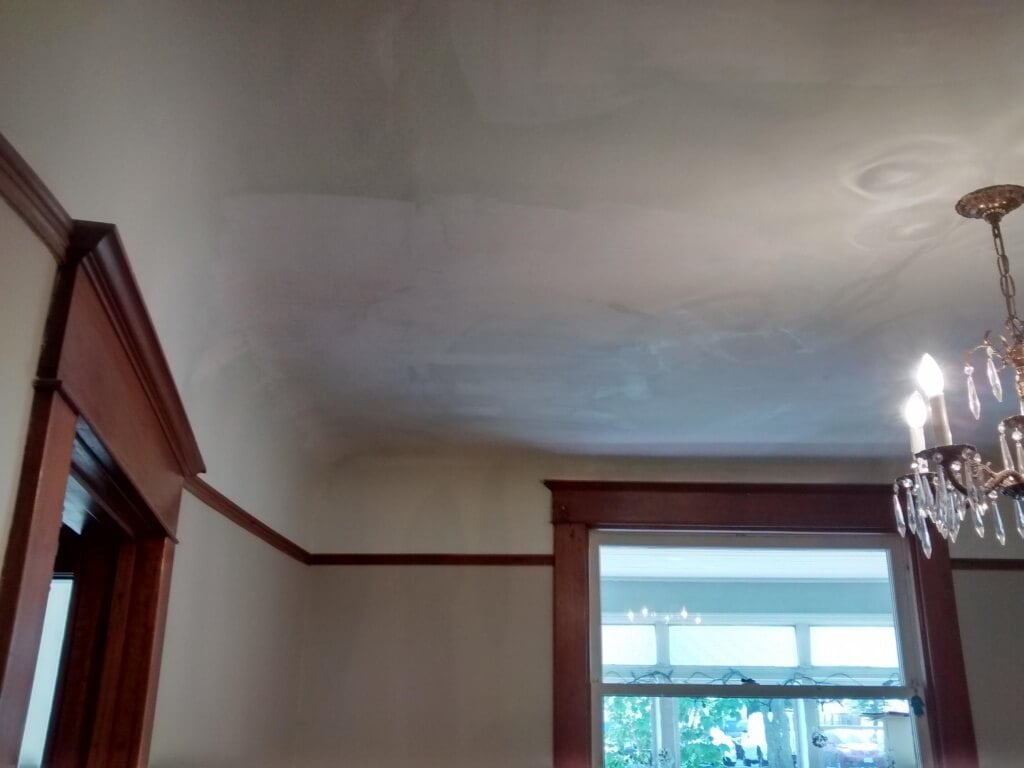
A sure sign that something is wrong is when a section of the plaster wall (or ceiling) starts to feel loose – like it is floating over the underlying lath rather than being securely attached to it. You can gently press it back in to place where it feels secure, but when you release, it loosens up again. This is not something to ignore!
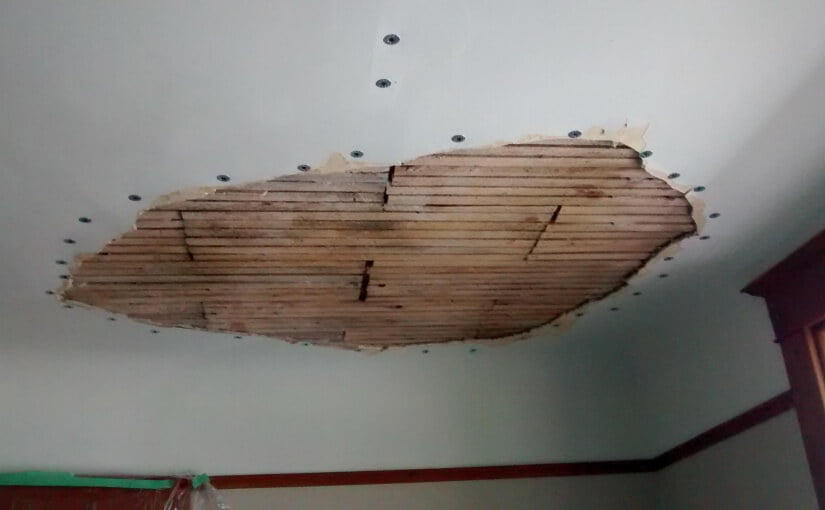
Sooner or later, that loose plaster will crack, break, and fall off the underlying lath altogether. Maybe a section of the plaster has already fallen off and lies in crumbled bits on the floor.
All of a sudden, the question of how the heck this gets fixed becomes very much front of mind.
To reiterate, once (and if) you notice loose sections of plaster, it is only a matter of time before they start to crack, crumble and fall. Which will only make the eventual repair that much harder. It is always best to catch things early and repair before things get worse.
So, what gives with this newly gravity challenged plaster? What do we do when we come home to a living room full of plaster ceiling all over the floor?
Hopefully, we’ve discovered the situation before our walls and ceiling start falling off altogether, when they’re still at the ‘loose’ stage. Either way, loose walls, loose ceiling, wall or ceiling plaster all over the floor, our old lath and plaster is in need of some urgent maintenance.
So what are we supposed to do now? (Hint: Heading out to a bar that doesn’t have plaster all over the floor and ignoring the situation is not the correct answer).
To understand what’s going wrong, let’s first look at how lath and plaster is supposed to work. Like, how it’s faithfully held together for the last hundred years or so before finally falling apart a bit on you now…
Anatomy of a Lath and Plaster Wall
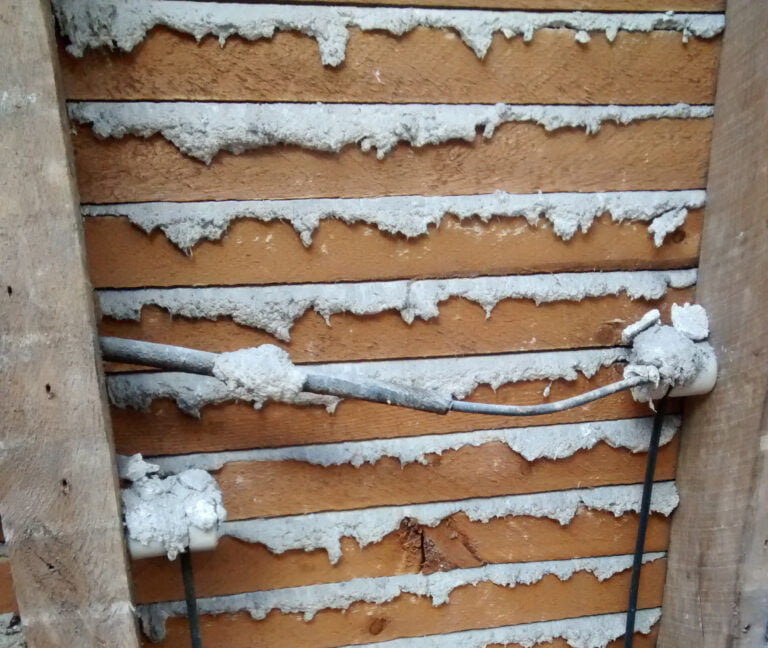
In the picture above, we have a behind-the-scenes look at a typical lath and plaster wall section, between a couple of wall studs. This wall is still in good condition. This is more or less exactly how the wall would have looked from this angle a hundred years ago when it was freshly made, minus a bit of patina.
BTW, yes, those wires we see above are part of the infamous, much maligned ‘knob and tube’ electrical system of days gone by. The wires secured to porcelain standoff ‘knobs’ on either side of the cavity would have been ‘hot’ on one side of the cavity and ‘neutral’ on the other. And no, there was no ground wire. The horizontal bit of wire we see is encased in a porcelain ‘tube’ that protects the wire where it travels through wall studs (although the tube pictured here is longer than standard for a single stud). Anyway, this is not an article about the perhaps unfairly derided, but certainly due for an update, knob and tube wiring system!
So then, back to the subject at hand. Which is … oh yes … lath and plaster repair!
Before the advent of large convenient commercially produced sheets of perfectly flat and characterless drywall, walls were hand plastered over strips of wooden lath.
The process was that stud wall frames were built, in a similar manner to today’s framed walls. As a base for the plaster to adhere to, wooden strips of ‘lath’ were then nailed horizontally across the wall studs (and ceiling joists). Lath strips were made of rough cut wood, generally around an inch to an inch and a half wide, by around a quarter inch thick. These strips were nailed with gaps of around a quarter inch between them.
A thick first coat (the ‘scratch coat’) of plaster was then applied on top of the lath. The plaster used in this coat was relatively soft, and was reinforced with some sort of fiber for strength. Horsehair was commonly used in the early years, and is fairly easily identified as such in broken chunks of plaster.
It is also possible that asbestos could have been included in the plaster mix. This seems to be possible for plaster made anywhere between about 1910-1990 with greater likelihood between around 1940-1980. Some sources say that asbestos wasn’t used all that much in typical residential plaster work, but certainly it was used sometimes at least. This article isn’t about asbestos, but be careful and have the plaster tested if it might be an issue and you think you have reason for concern.
Anyway, some of the scratch coat of plaster oozed through the gaps between the lath strips. When it hardened, the plaster that oozed behind the lath created ‘keys’ that held the forward facing sheet of plaster in place. Those ‘keys’ are what we see in the picture above, from the backside of the wall.
After the scratch coat dried, they might have applied a second base coat known as a ‘brown coat’ over the scratch coat. Or not. Certainly, they would have applied a thin top coat of a very hard (much harder than the scratch coat) plaster to finish the wall.
There were a few neat tricks in the application process to make it quicker and more consistent in thickness than a purely hand applied finish, but that is more or less how a lath and plaster wall (or ceiling) was constructed.
So What's Gone Wrong?
Over the decades, the walls get bumped in to. Kids jumped on the bed & the floors, and they also banged lots of stuff in to the walls. The adults did a little bit of that as well. The house settled a bit in to it’s foundation. There were a few minor tremors, both natural and man made when they replaced the road and the sidewalks. Etcetera and so on and so forth.
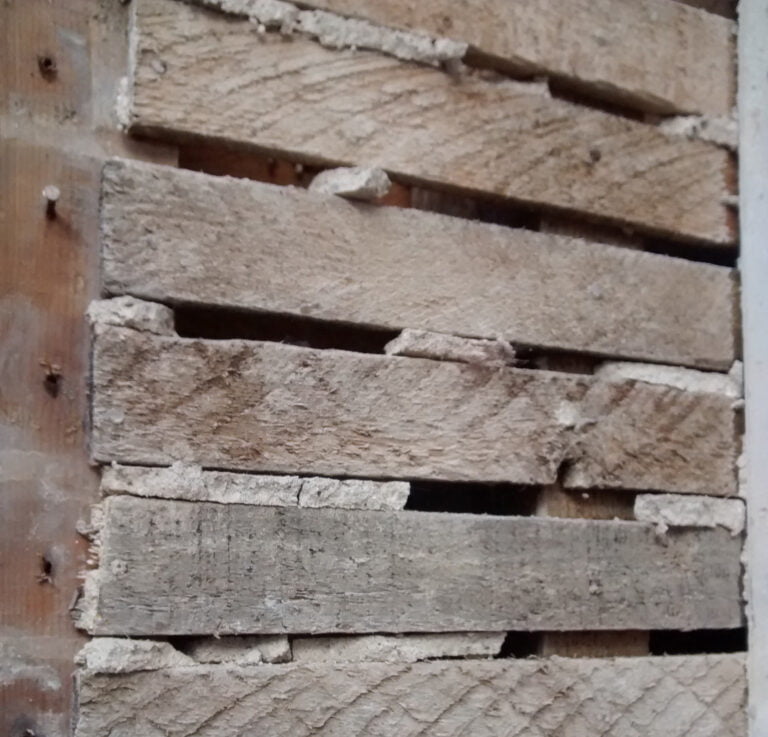
Pictured above, we can see what’s left of the keys once the front facing plaster wall has broken off.
The keys holding the plaster on to the walls slowly started cracking, and the sheet of plaster once held so nicely to the lath by the plaster keys started to become a little more free-standing, then it started to crack and became a little more free and a little less standing, falling away from the broken keys. Now you’re staring at it saying “I’m pretty sure this doesn’t look exactly right any more.”
So that’s the background, but the real question is how to remedy the situation!
Fixing Lath and Plaster Walls and Ceilings

You can tell when sections of your wall or ceiling are about to fall off when you see areas that are protruding or bubbling out from where they were, sometimes with cracks or ridges along the outlines. When you gently push on those areas, you find ‘soft spots,’ where sheets of plaster seem to be floating independent of the rest of the solid wall below. Why does it feel that way? Because they are! The keys have broken away from the front facing plaster.
This is a situation that is best dealt with sooner than later – it’s not going to fix itself, and it’s quicker and easier to deal with at an earlier stage. If those bits of plaster haven’t actually fallen off the wall yet, it will be easier to fix now than in a little while, when they have actually fallen off.Where the plaster has already started coming off in slabs, then you carefully remove any bits that are still hanging on but are beyond saving. Sometimes there are pieces that are loose, but not loose enough that they can’t slide back nice and tight against the lath again – bigger pieces of those are likely worth saving, but smaller ones can go – it’s a bit of a judgement call based on how much is gone, how much is capable of being saved, how big of a piece you’re considering trying to save etc. – a bit more guidance follows below … but for now, the main trick:
Using Plaster Repair Washers

Take standard coarse threaded drywall screws (usually 1 5/8″ is a good length) inserted in to special plaster repair washers, and carefully secure the plaster that’s still capable of being saved by screwing through the plaster in to the lath, thereby squeezing the plaster snugly once again against the lath with the washer.
If none of the plaster has come off yet, and you can push the loose section back tight against the lath, then you gently do that and then secure it wherever it seems loose with the screws and washers.
If, in screwing one of of the screws in, there’s no bite and the washer doesn’t snug up nicely, odds are that you’ve hit the gap between pieces of lath. Remove the screw and try again, up or down around 3/4″
It is often best to pre-drill for the drywall screws with a 1/8″ bit. This helps to prevent the plaster, and the lath underneath, from splitting from the drywall screw.
If the plaster hasn’t yet fallen off your wall but has progressed to a point where it can’t be pushed back tight against the lath (which happens when bits of broken plaster fall between the lath and the back of the front-facing plaster), then you secure around the affected area in the areas where you can get it nice and tight, and then break out the part that won’t cooperate.
Once you have all the remaining plaster nicely secured to the lath with the screws & plaster repair washers in the affected area – all around the perimeter of the gaping holes where they exist – and enough to have eliminated any soft loose spots where the plaster remains – you can clean away any remaining bits of loose plaster and trim any protrusions above surface level from cracks etc. with a utility knife. You’ll then want to dust out and vacuum all around the edges and get things nice & clean.
So, you should by now have what’s left of the damaged area attached nice & securely to the lath. You also have a bunch of those silver discs clashing with your general decor. Also maybe a gaping hole or two of exposed lath.
If you’re left with any sort of significant open areas of exposed lath, you’ll want to cut a piece of drywall to fit the hole as reasonably closely as possible, then screw that to the lath (& studs where possible) using just the drywall screws (no discs necessary). Half inch thick drywall is usually good, but use thicker if that will line up more flush with the finished plaster surface.
It’s a good idea at this stage to thoroughly check for other damaged areas in the room – these things often travel in packs. You’ll be doing some plaster repair & repainting, so best to get it all now. You can check for other ‘soft spots’ by gently pressing against the plaster with your fingers – you’ll get the feel of a solid wall vs. a soft & loose spot pretty quickly, if you haven’t already. Usually if you find a few soft spots at this stage, that you haven’t really noticed before, they’re early enough along that a few screws & plaster repair washers will cure them without creating too many more huge gaping holes.
Replastering the Repair
Now it’s time to break out the drywall compound. You’ll want to get your hands on some of the harder non-sandable joint compound & fibreglass tape for the first coat(s)… to go with your drywall tools …
hmmm … I don’t think this post is going to extend to the whole “how to finish drywall with drywall compound” thing …maybe that will be a subject for a future post. Essentially though, from this stage on, you will be filling the remaining gaps with the compound, creating new keys where appropriate. Over the course of several coats, switching to a sandable compound after the bulk of the holes have been filled, you will finish up much like any other drywall project.
The non-sandable, harder drywall compounds are a better choice than the softer sandable drywall compounds for your first couple of coats here. It’s stronger and more compatible with the old plaster. Just use it to fill the deep areas to be repaired, creating new keys where possible, to bring things generally very close to surface level over the first one or two or three coats. More thinner coats are better than fewer thick ones. Make sure you don’t leave any of the non-sandable compound above surface level to dry. Otherwise you’ll have to sand it off, which is no fun. The last thin coats can then be a standard compound – Dust Control compounds are a favorite, as they will contribute to keeping the sanding dust mess to a minimum. All of these things are available at your local home center or hardware store.
Take your time & apply enough coats as are necessary to smooth your wall to perfection, prime & paint & you’re done!
Further Hints: Safety first: always make sure to wear a good mask while dealing with the old plaster (and the drywall compound dust). Crumbling old plaster is gross, dirty, dingy & dusty and sometimes has nasty ingredients in it. Take precautions or have it tested if you’re not sure.
Make sure that any crumbling plaster chunks, bits and dust are contained in a tarp or something, and do not land directly on your floor. Clean up often. Carefully clean any bits of old plaster that get on your floor with a vacuum before they get ground in. Old crumbly plaster bits are highly abrasive to nice hardwood floors & will completely trash them a lot more quickly than you’d like.
Once finished, pat yourself of the back and continue to enjoy the beauty and benefits of original plaster walls – in addition to their warmer and greater character, they are more sound insulating than drywall, more fire and mold resistant, as well as being harder and more damage resistant.
Good luck with your plaster repair project! If you have any questions or pointers, please leave them in the comments!